Genograms
Genograms (also known as family trees) are a simple tool that allow us to see how a family is made up.
A genogram is another way of describing a family tree and can be useful for establishing who is living in the home, who is in the wider family network, and whether there is contact or not. By creating and using genograms and ecomaps with children and young people, you can establish a lot about the context the child or young person is living in, who is important to them and who may have parental responsibility. Genograms use a common set of symbols, and we will explain how to use these to construct and read a genogram.
What is a genogram?
McGoldrick (2016) describes a genogram as:
Simply put, a genogram is a map of who you belong to. [...] A genogram offers the clinician a basic picture of who clients are, where they come from, and who matters in their lives.
(Page 1, McGoldrick, M. 2016. The Genogram Casebook. New York: W.W. Norton and Company Inc.)
Example genogram
Harry (represented by the green block) attends your setting. Through working with him, you have established who the adults are in his immediate family, going back to his mother's parents. Each line in the genogram represents a generation, with all the children on the bottom line, the parent's generation above them and the grandparent's generation at the top of the diagram. Females are represented by circles, and males by squares.

Breaking down the genogram
Initially, it may look confusing, but let's break it down and look at what the individual parts of the genogram are telling us. Expand each of the accordion sections below to find out more about the different parts of the genogram.
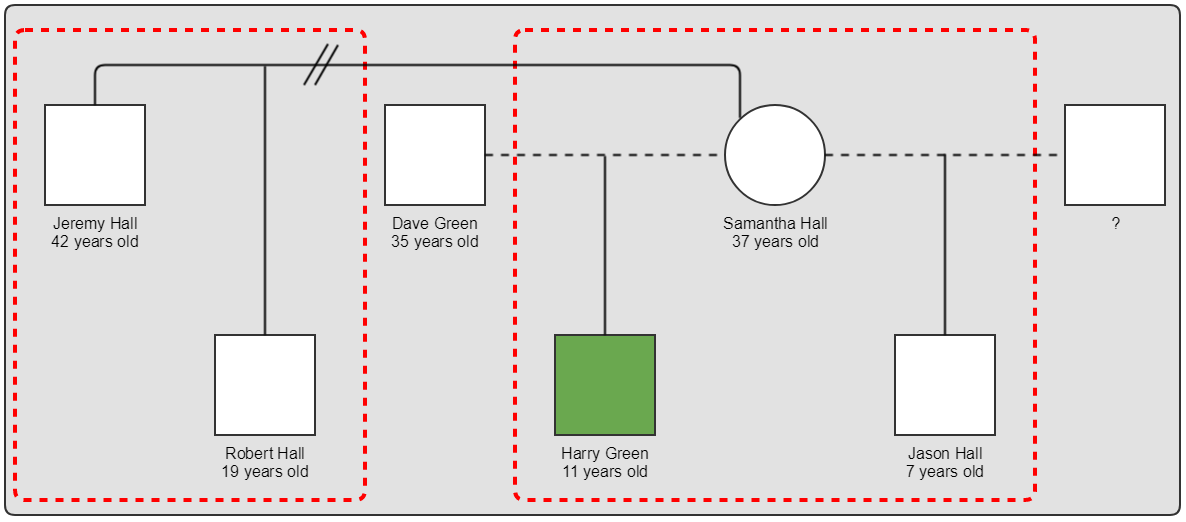 From this we can see that Harry has two half-brothers (both had different fathers), one older and one younger. We can also see that Harry lives with his mother and younger brother, Jason, whilst his older brother, Robert, lives somewhere else with his father (represented by the red dotted lines around the groups of people).
The solid line between Samantha and Jeremy indicates that they were married, however, we know that they have divorced because there is a double strike through this line. We also know that Samantha was not in a long term relationship with Harry's father because the line between them is dashed, and that this is the same for the relationship between Samantha and Jason's father.

From this we know that Grace and Simeon were not in an enduring relationship (shown by the dashed line between them), and they have separated (shown by the single strike through of the dashed line). Grace and Simeon are Samantha's parents, so maternal grandparents to Harry and his siblings.
We know that Grace is currently married to, or in an long term relationship with, James Wright (shown by the solid line between them) by whom she has a daughter, Eve.
We also know that at some point Grace was married to John Taylor, however they are divorced (shown by the double strike through the solid line) and they did not have any children as a result of their relationship.
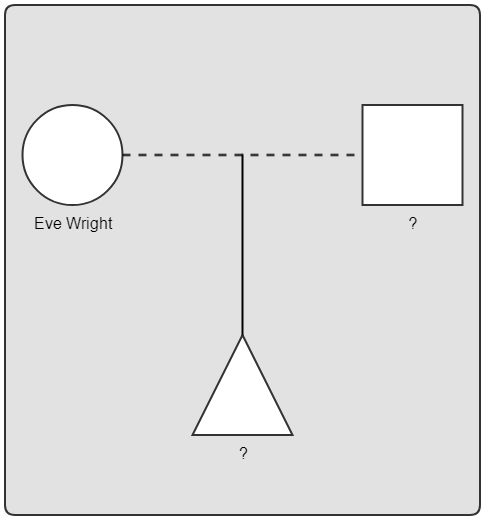 From this we can see that Eve is (or has recently) been in a relationship with an unknown person by whom she is currently pregnant. The triangle indicates that the sex of the child is not yet known.
Tips for completing a genogram
Ensure that you use a large piece of paper - on many occasions an A3 sheet may be necessary due to the complexities of family dynamics.
Date when the original genogram was completed, and when any subsequent information is added. This allows you to keep track of changes over time.
It doesn't have to just be in black and white. It may be useful to add colours to identify specific family groups within the genogram.
Record as much as you can in terms of additional information (e.g. ages, dates of birth, year or date of death etc.) as this adds more context.
Disadvantages of genograms
Whilst providing a useful summary of the family relationships, genograms do not cover the dynamics in the home and wider family. With what are termed "blended families" on the rise, genograms do not reveal the amount of contact there is between family members, or who is important to the child (i.e. the context in which they live). If we consider Harry in the example above, the following questions are not answered:
Does he have a relationship with his father?
How often does he see his father?
Who does he see as his grandparents - Grace and James or Grace and Simeon?
Does he see his older half-brother?
Is there any relationship or contact with his maternal aunt (Eve)?
Therefore, a second document, known as an ecomap, can be very useful to support genograms by providing an idea of who the young person sees as important.
Quick Reference
We have developed a single-page document that provides a quick reference guide to genograms - download it here.
Shopping cart
Action Required